
Entrust Identity Verification for Okta: Product Guide
Start here
This guide presents a technical overview and the implementation steps required for Entrust's Okta-native workforce identity verification solution, available for integration through Workflow Studio.
Solution overview
Entrust Identity Verification for Okta is a workforce identity verification solution that enables enterprises to verify a user's identity to prevent impersonation and unauthorized account access during critical lifecycle moments.
This solution is designed for key Know Your Employee (KYE) use cases, including employee onboarding, multifactor authentication (MFA) enrollment and recovery, and account unlock. These security-sensitive moments are often the most vulnerable to fraud attacks and account takeover attempts. Many organizations rely on traditional verification methods that are either insufficient from a security perspective or require complex custom-built integrations that are difficult to implement and maintain.
Built for organizations already using Okta, Entrust's Okta-native solution allows customers to configure Entrust IDV as an identity verification vendor within the Okta Admin Console. At critical lifecycle moments when identity verification is required, Okta redirects the user to an Entrust-hosted verification journey that includes document and biometric liveness checks. After the identity checks are completed, Entrust returns a verification result to Okta, which evaluates that result and makes the final policy and access decision.
Configuring Identity Verification for Okta
Entrust's Okta-native workforce identity verification solution requires configuration in two separate environments: Workflow Studio and the Okta Admin Console.
Workflow Studio configuration
Your starting point for integration is your Workflow Studio dashboard. As prerequisites, you will need an existing Okta tenant, as well as a Studio workflow configured to run identity verification for Okta.
To simplify your integration, Workflow Studio comes with a pre-configured workflow template that can be used for Okta identity verification use cases. Select the Okta KYE Identity Verification template when creating a new workflow in the Workflow Builder. You are free to modify the Okta template with additional verification signals as required, within the constraints noted below.
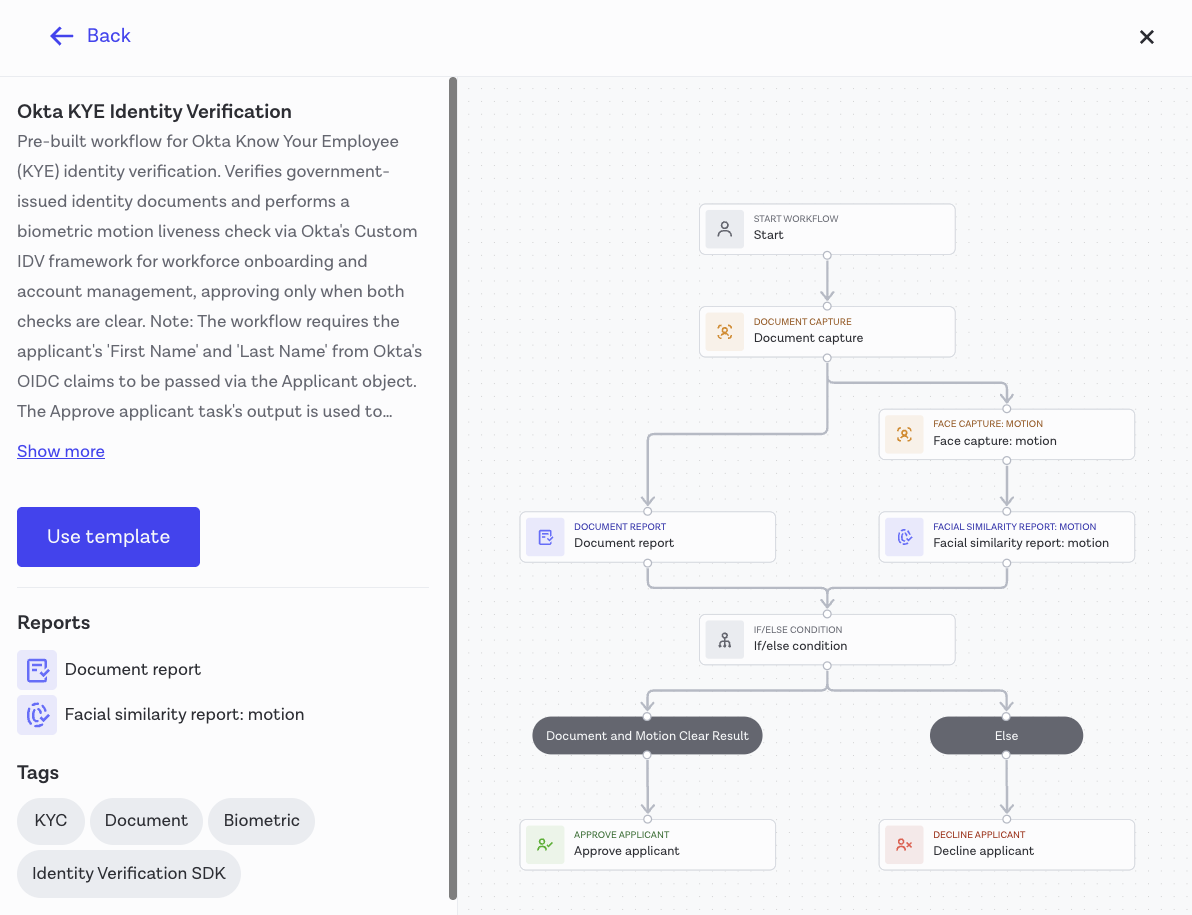
While the Okta template is flexible and can be modified, two elements must be preserved for the integration to function correctly:
- The
first_nameandlast_nameapplicant inputs must be provided. These are passed from Okta's OIDC claims via the Applicant object. - The document report's
data_comparison_resultmust remain as the approved workflow's output.
Optionally, dob (date of birth) can also be provided as an applicant input, if configured to be passed from Okta.
Once a Studio workflow has been created, you can generate the connection credentials for Okta by navigating to Developers in the Workflow Studio dashboard and clicking on Okta.
In the IDV configuration section, enter your Okta domain and the ID of the published Studio workflow you have configured to run Okta identity verification.
In the Credentials section, you can generate a Client ID and Client secret to enter into your Okta Admin Console. These values establish trust and secure communication between both platforms and enable Okta to invoke Entrust identity verification whenever an authentication policy requires it.
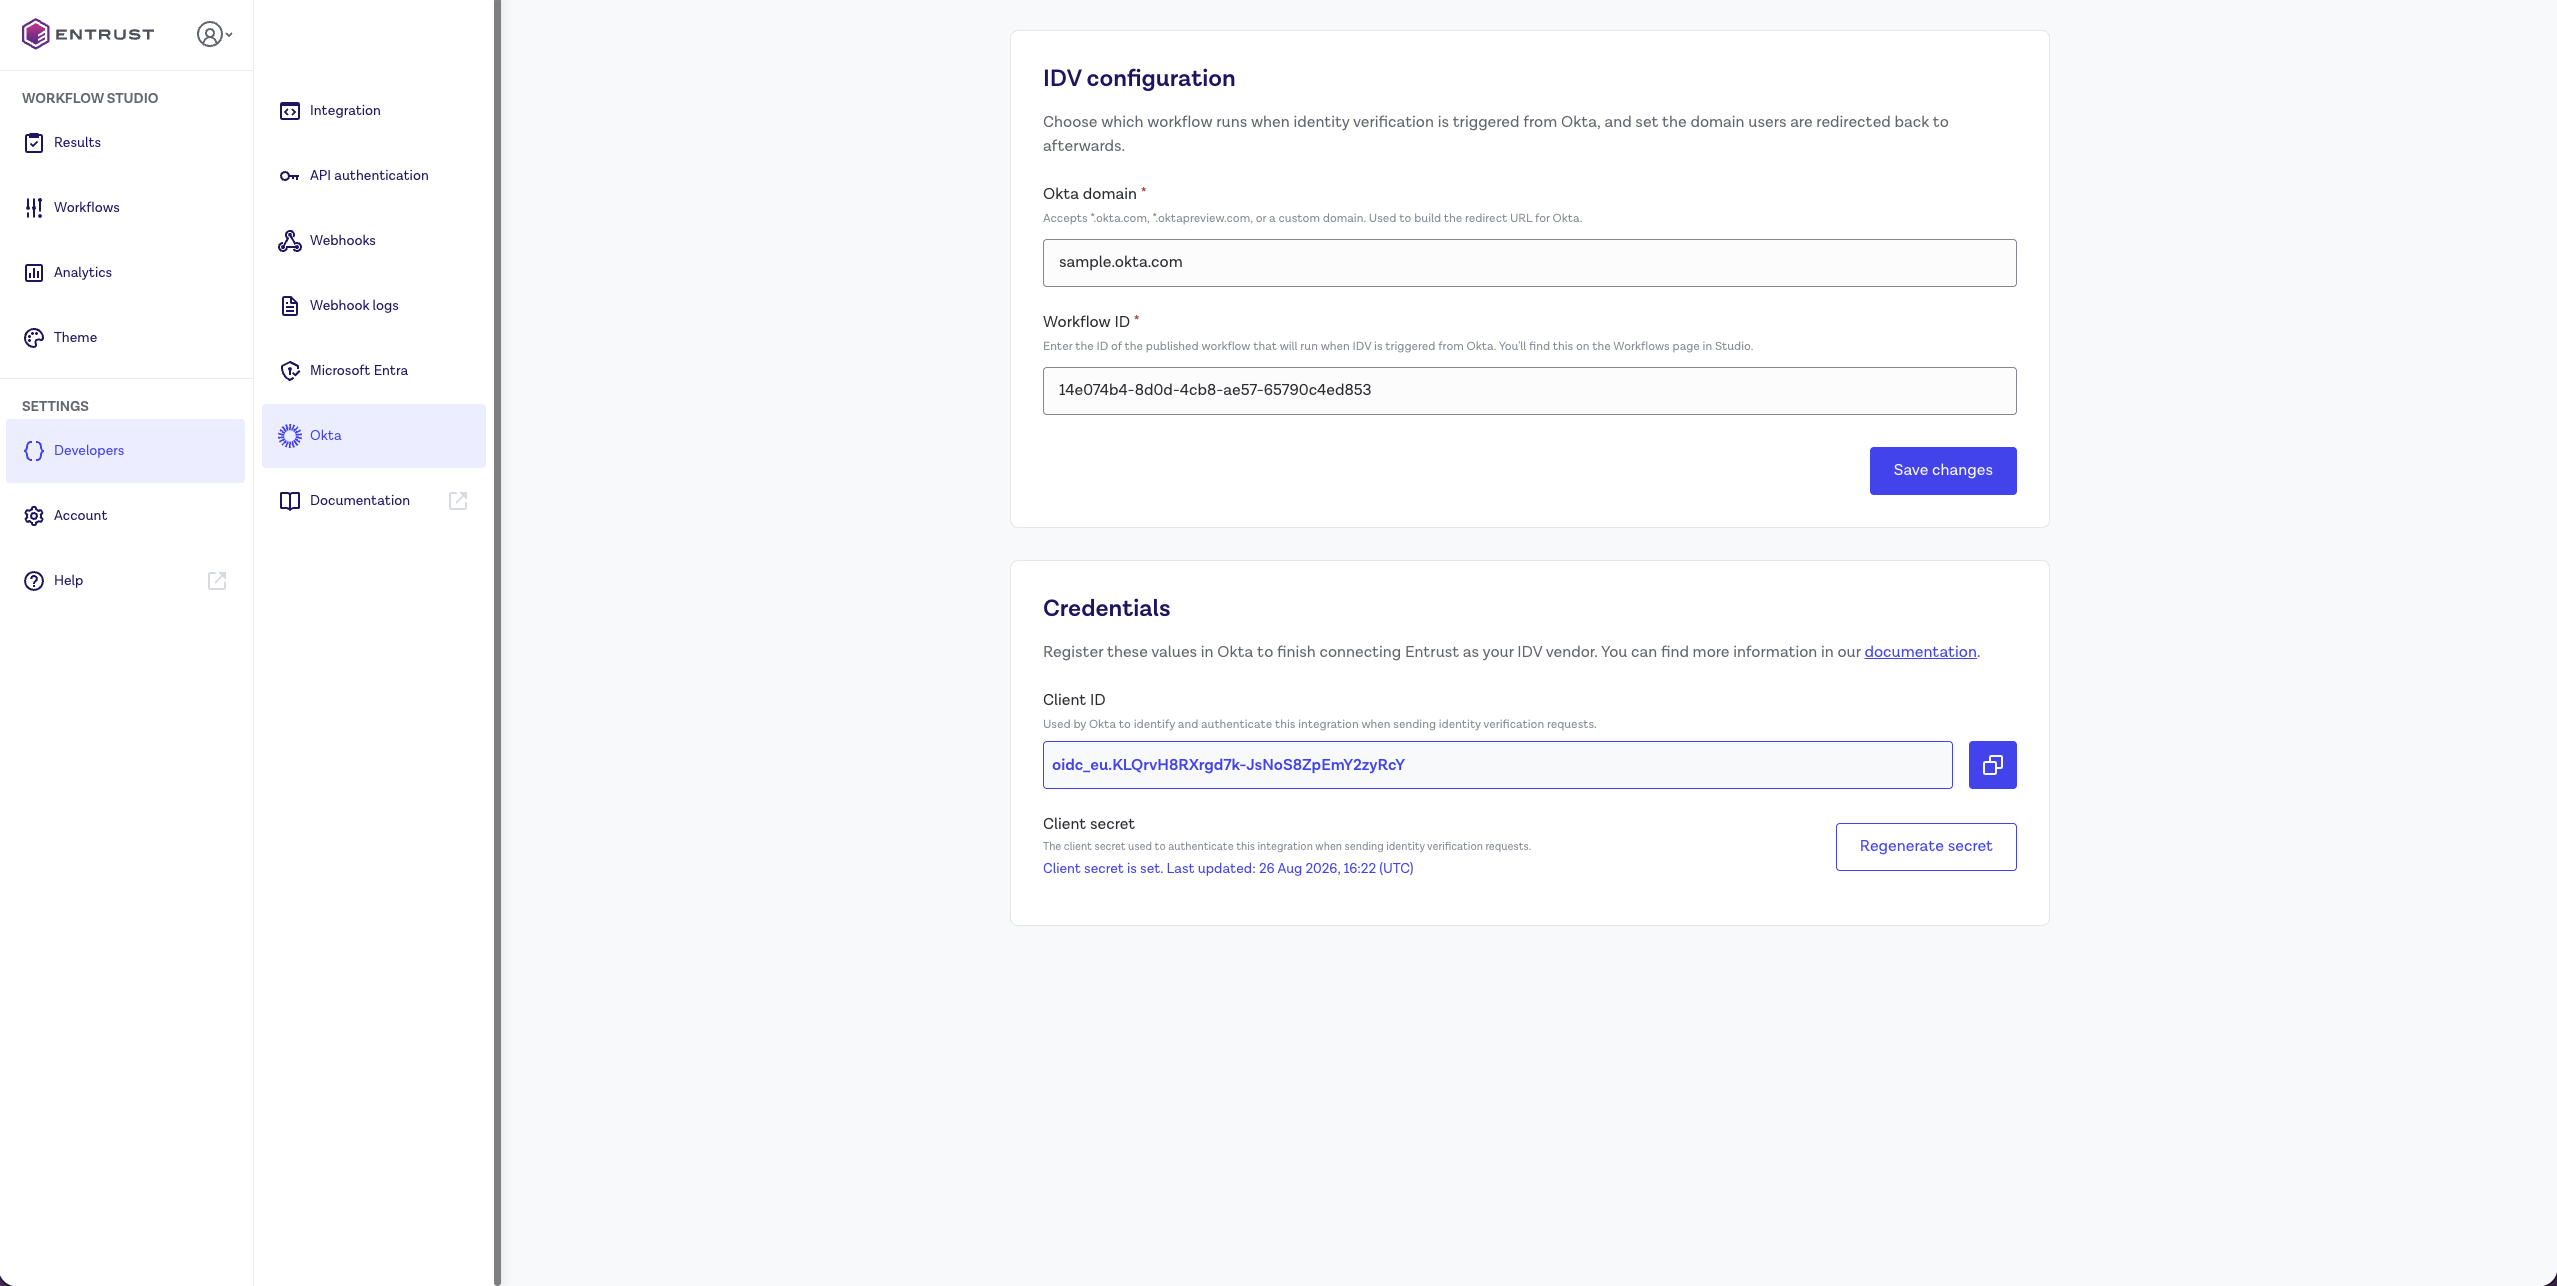
The Client secret is only displayed at the moment it is generated and cannot be retrieved afterwards. If the secret is lost, click Regenerate secret to issue a new one, then update the corresponding value in your Okta Admin Console. Regenerating the secret invalidates the previous one immediately.
The Client ID and Client secret must be copied and entered into your Okta Admin Console, as described in the next section.
Okta Admin Console configuration
Credential reference
When connecting Entrust IDV in the Okta Admin Console, you will be prompted to enter the following values, both of which are generated in the Workflow Studio Credentials section:
| Field | Description |
|---|---|
| Client ID | Unique identifier issued by Entrust for your Okta tenant registration |
| Client secret | Confidential key associated with the Client ID |
To add Entrust IDV from the Okta Integration Network (OIN), navigate to Applications and select Browse App Catalog. Search for Entrust IDV and click Add Integration. Enter the Client ID and Client secret generated in Workflow Studio, then click Done.
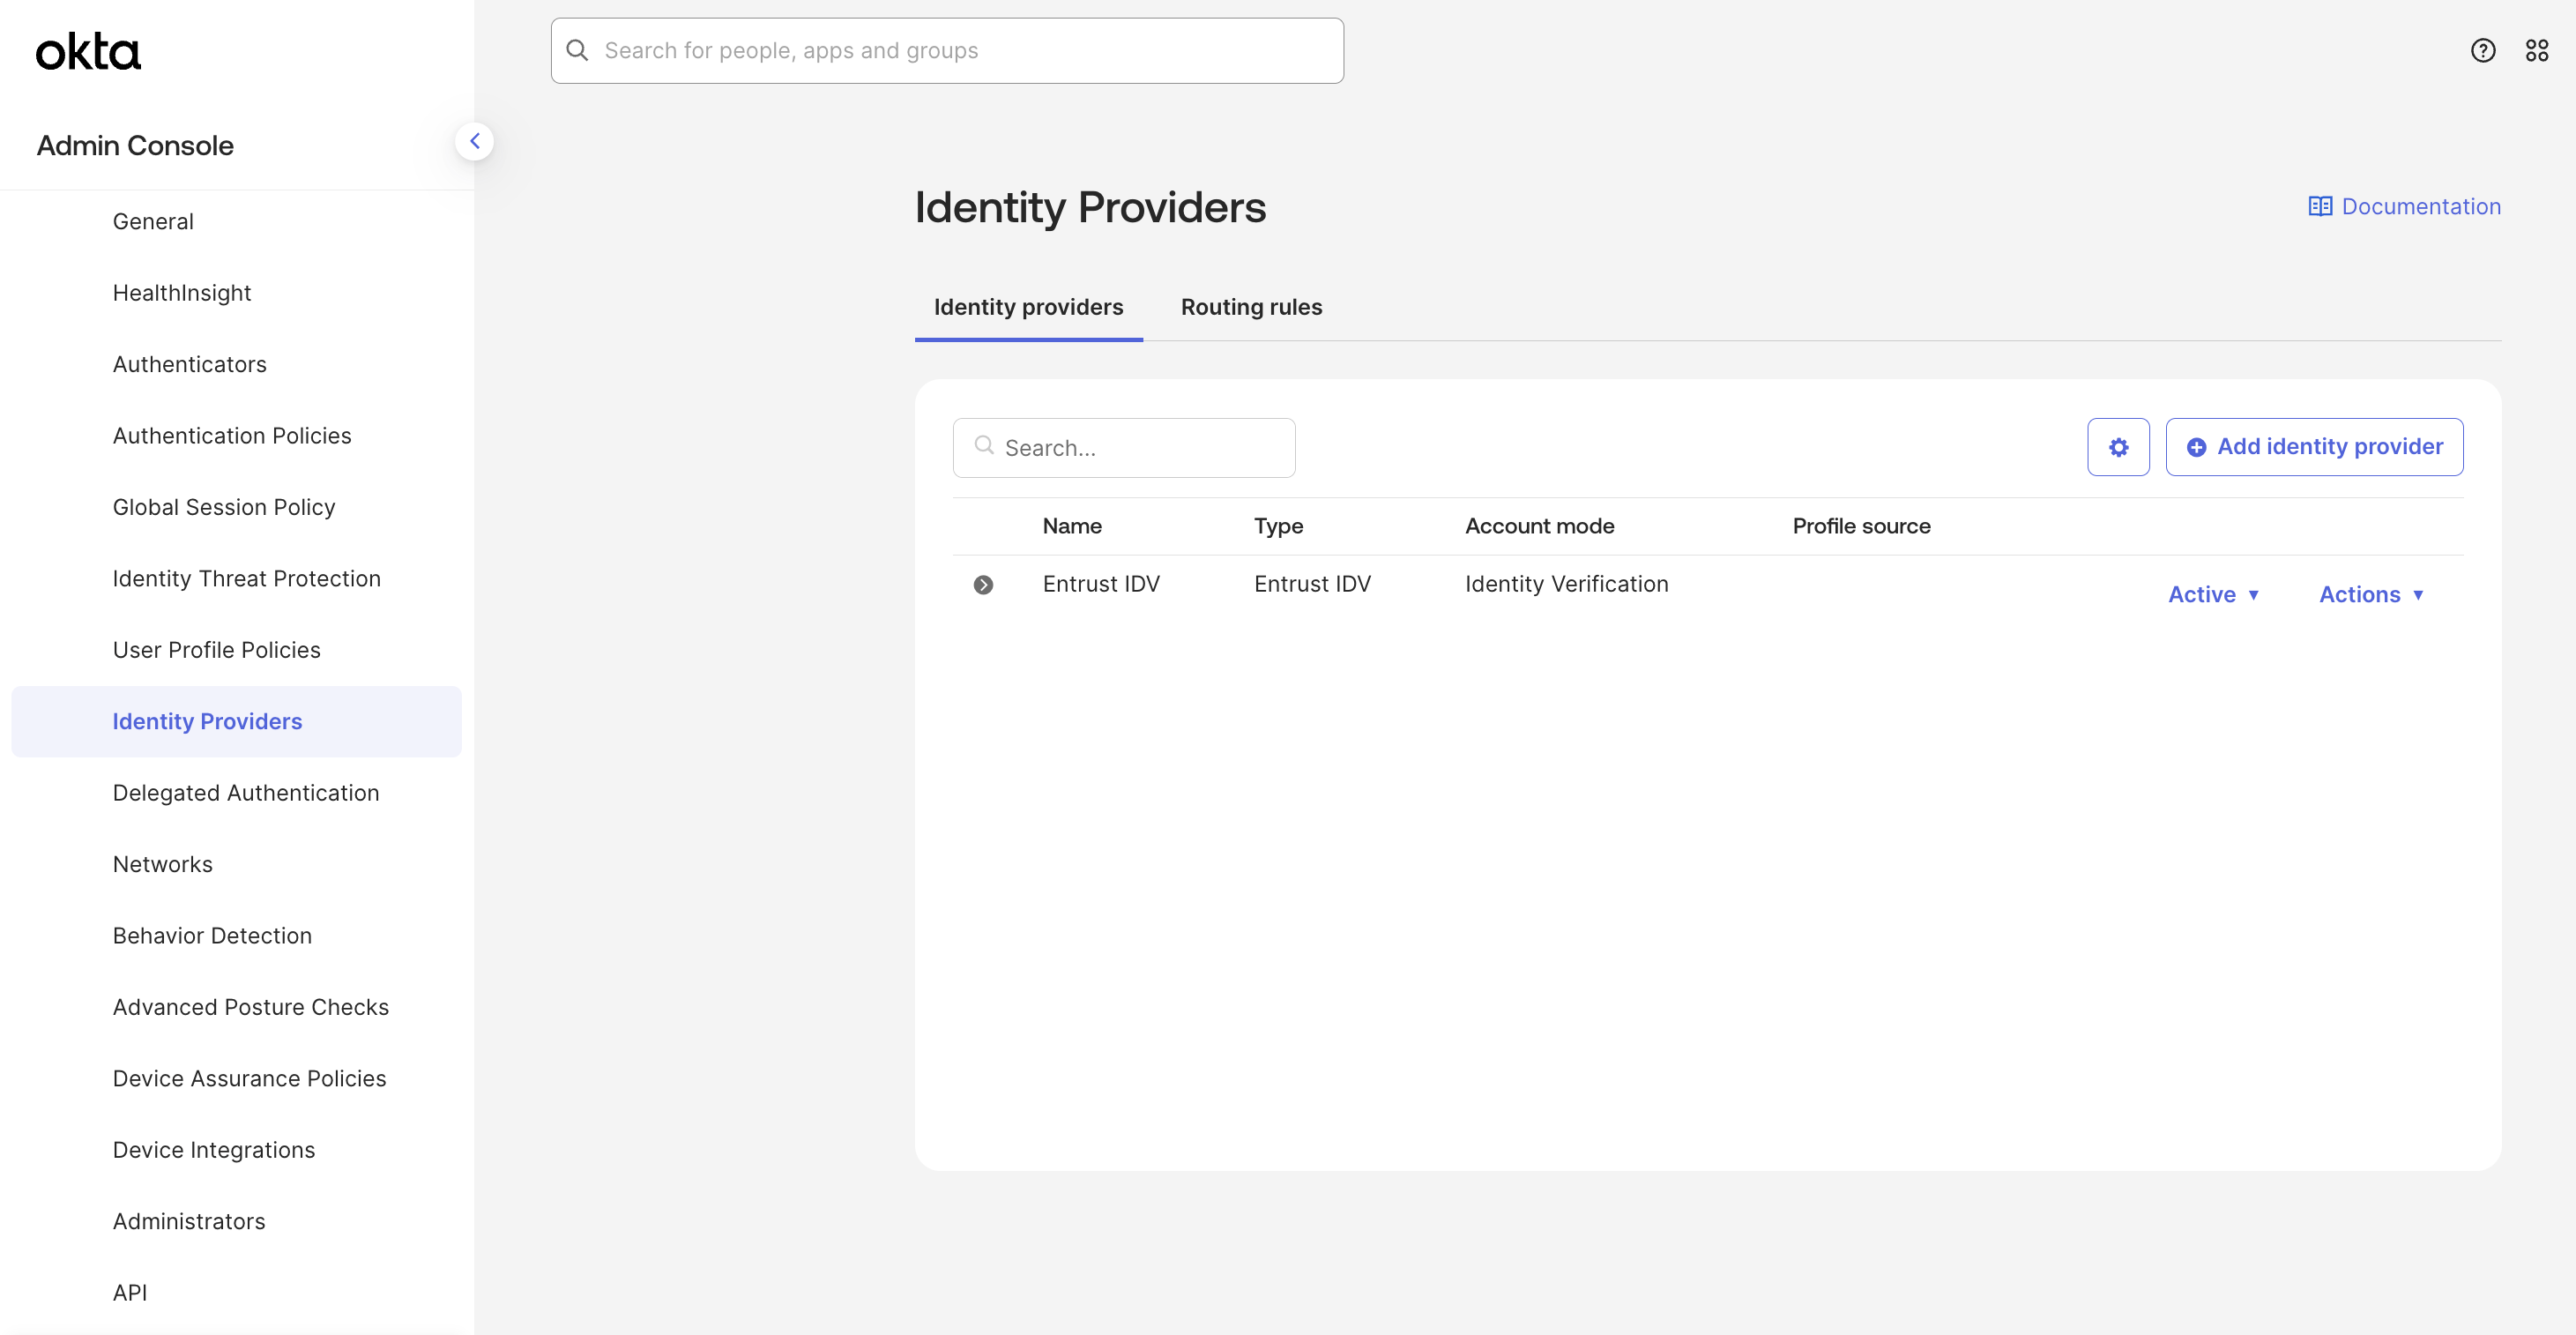
Next, administrators can configure the Okta account management authentication policy to require Entrust identity verification for the supported KYE use cases of employee onboarding, MFA enrollment, MFA recovery and account unlock.
To do this, navigate to Security and select Authentication Policies in the Okta Admin Console, then open the Okta account management policy. Click Add rule, and under THEN, set Access is to Allowed after successful > Identity verification, with Identity verification service set to your configured Entrust IDV vendor.
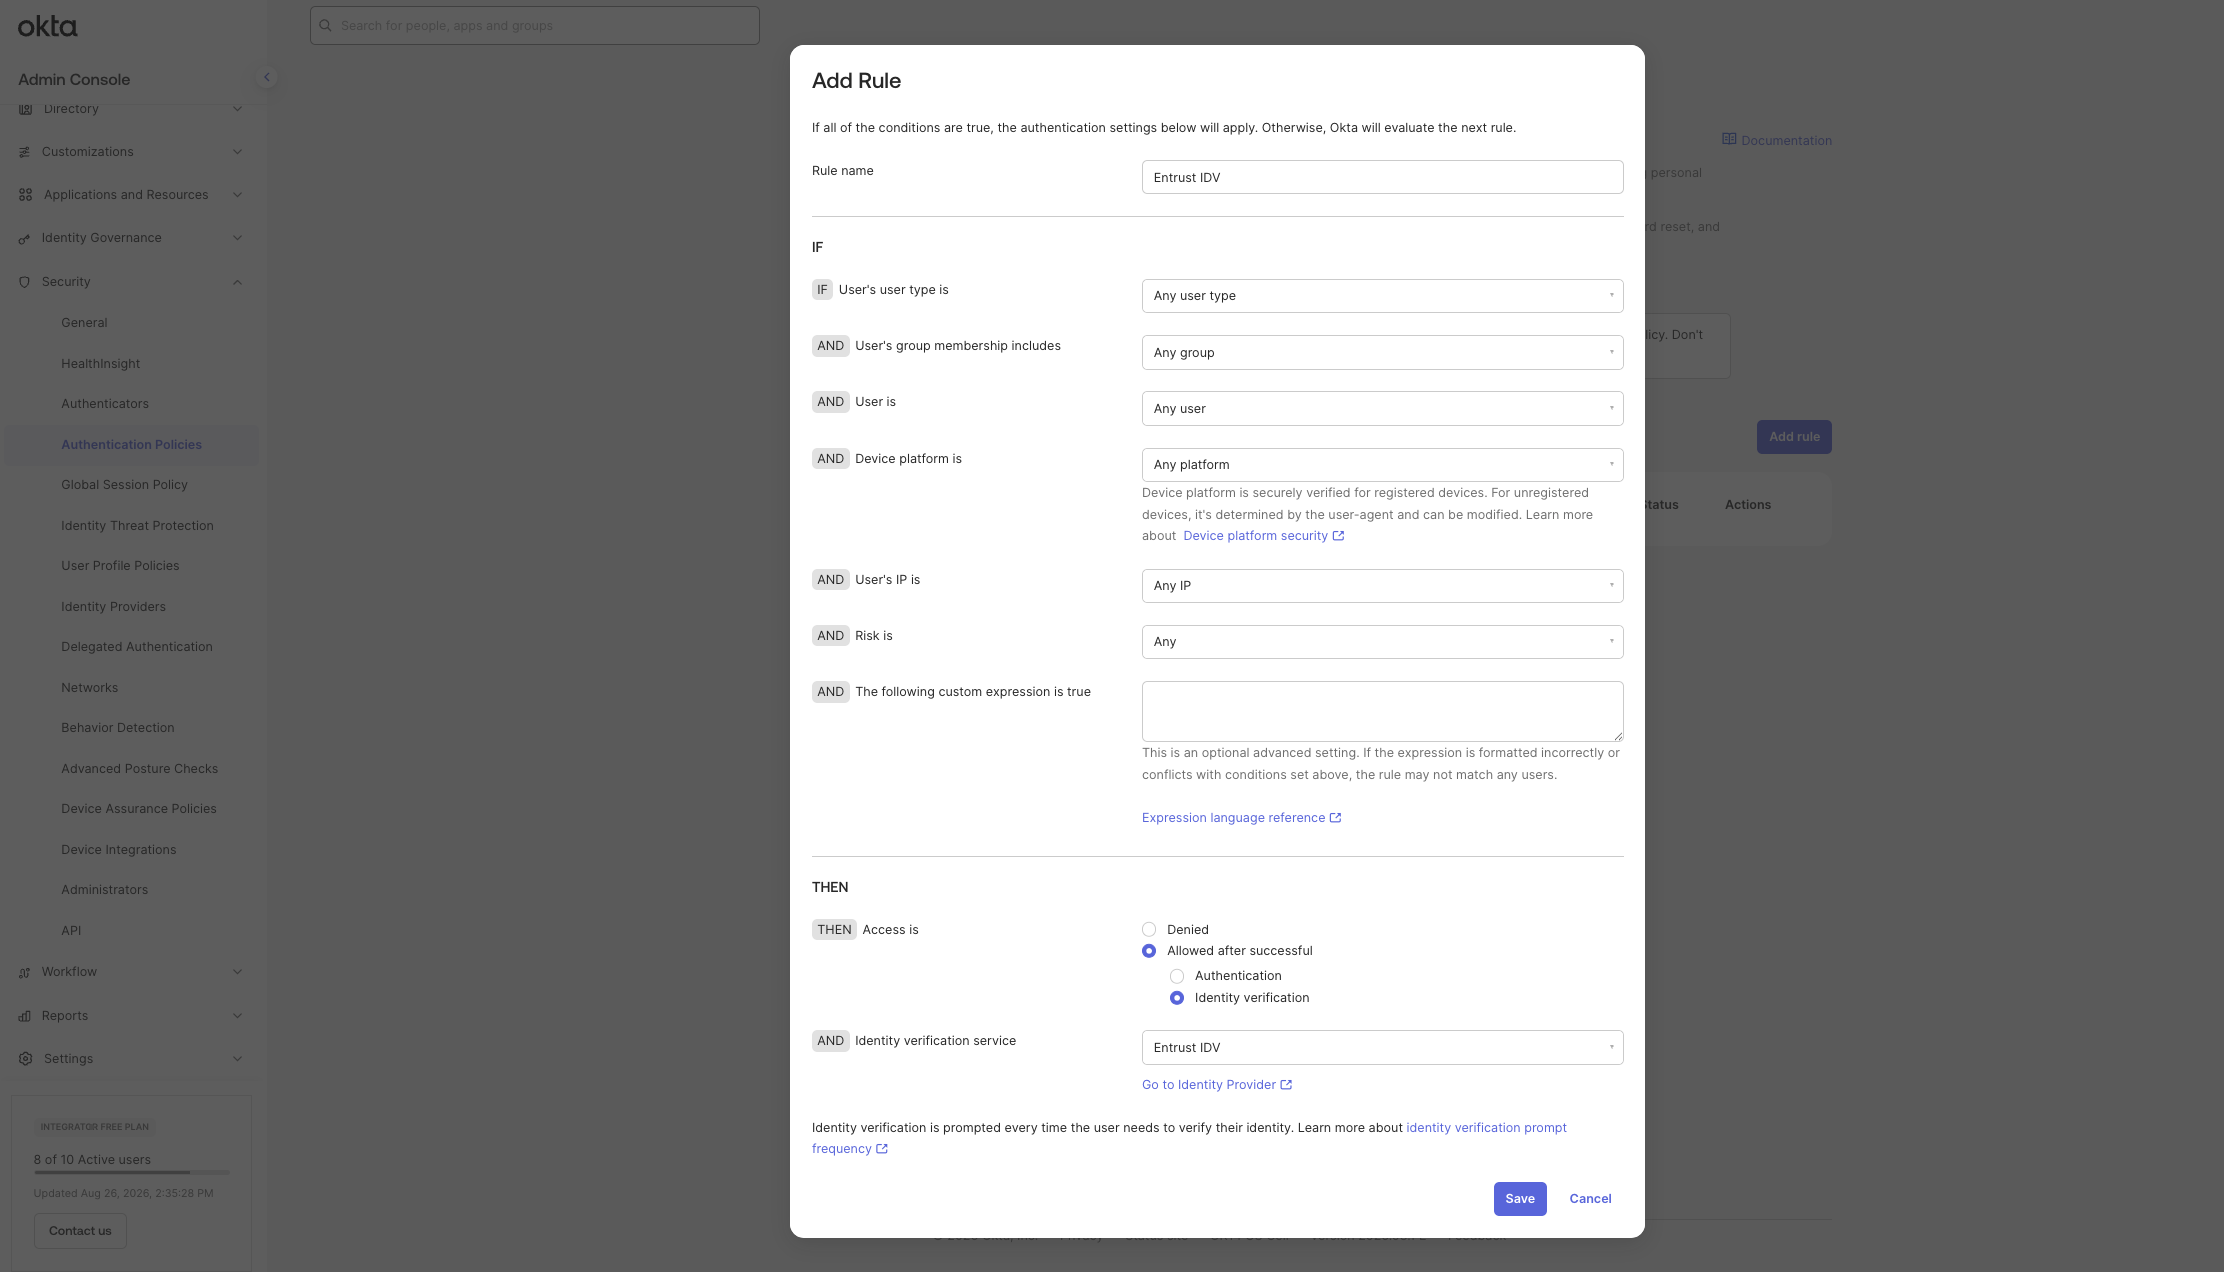
Once Entrust has been configured as an identity verification vendor and assigned to an Okta policy, identity verification is performed automatically whenever a protected action is initiated - Okta will evaluate the relevant policy and determine whether identity verification is required. If verification is needed, the user is automatically redirected to the Entrust-hosted verification journey, where they complete document and biometric verification checks. Entrust returns a verification result to Okta, which evaluates the outcome and either allows or denies the requested action according to the configured policy rules.
By default, this rule applies to all account management operations covered by the policy. To restrict identity verification to only specific operations, scope the rule as described below.
Scoping the policy rule to specific operations
To trigger Entrust identity verification only for specific account management operations, add a custom expression under the rule's IF conditions using accessRequest.operation == '<operation>', where <operation> corresponds to the desired KYE use case:
| KYE use case | Okta operation |
|---|---|
| Employee onboarding / MFA enrollment | enroll |
| MFA recovery | recover |
| Account unlock | unlockAccount |
To distinguish an expiring-password recovery from a standard forgotten-password reset, combine the operation check with accessRequest.metadata.type == 'expiry' (for example, accessRequest.operation == 'recover' && accessRequest.metadata.type == 'expiry').
Password Policy configuration
To trigger Entrust identity verification for self-service password reset, unlock account, or changing an expiring password, the Password Policy governing these actions must also be configured to defer to the Okta account management authentication policy you configured with Entrust IDV above.
To do this, navigate to Security and select Authenticators in the Okta Admin Console. Open the rule for the Password authenticator and set Access control to Authentication policy.
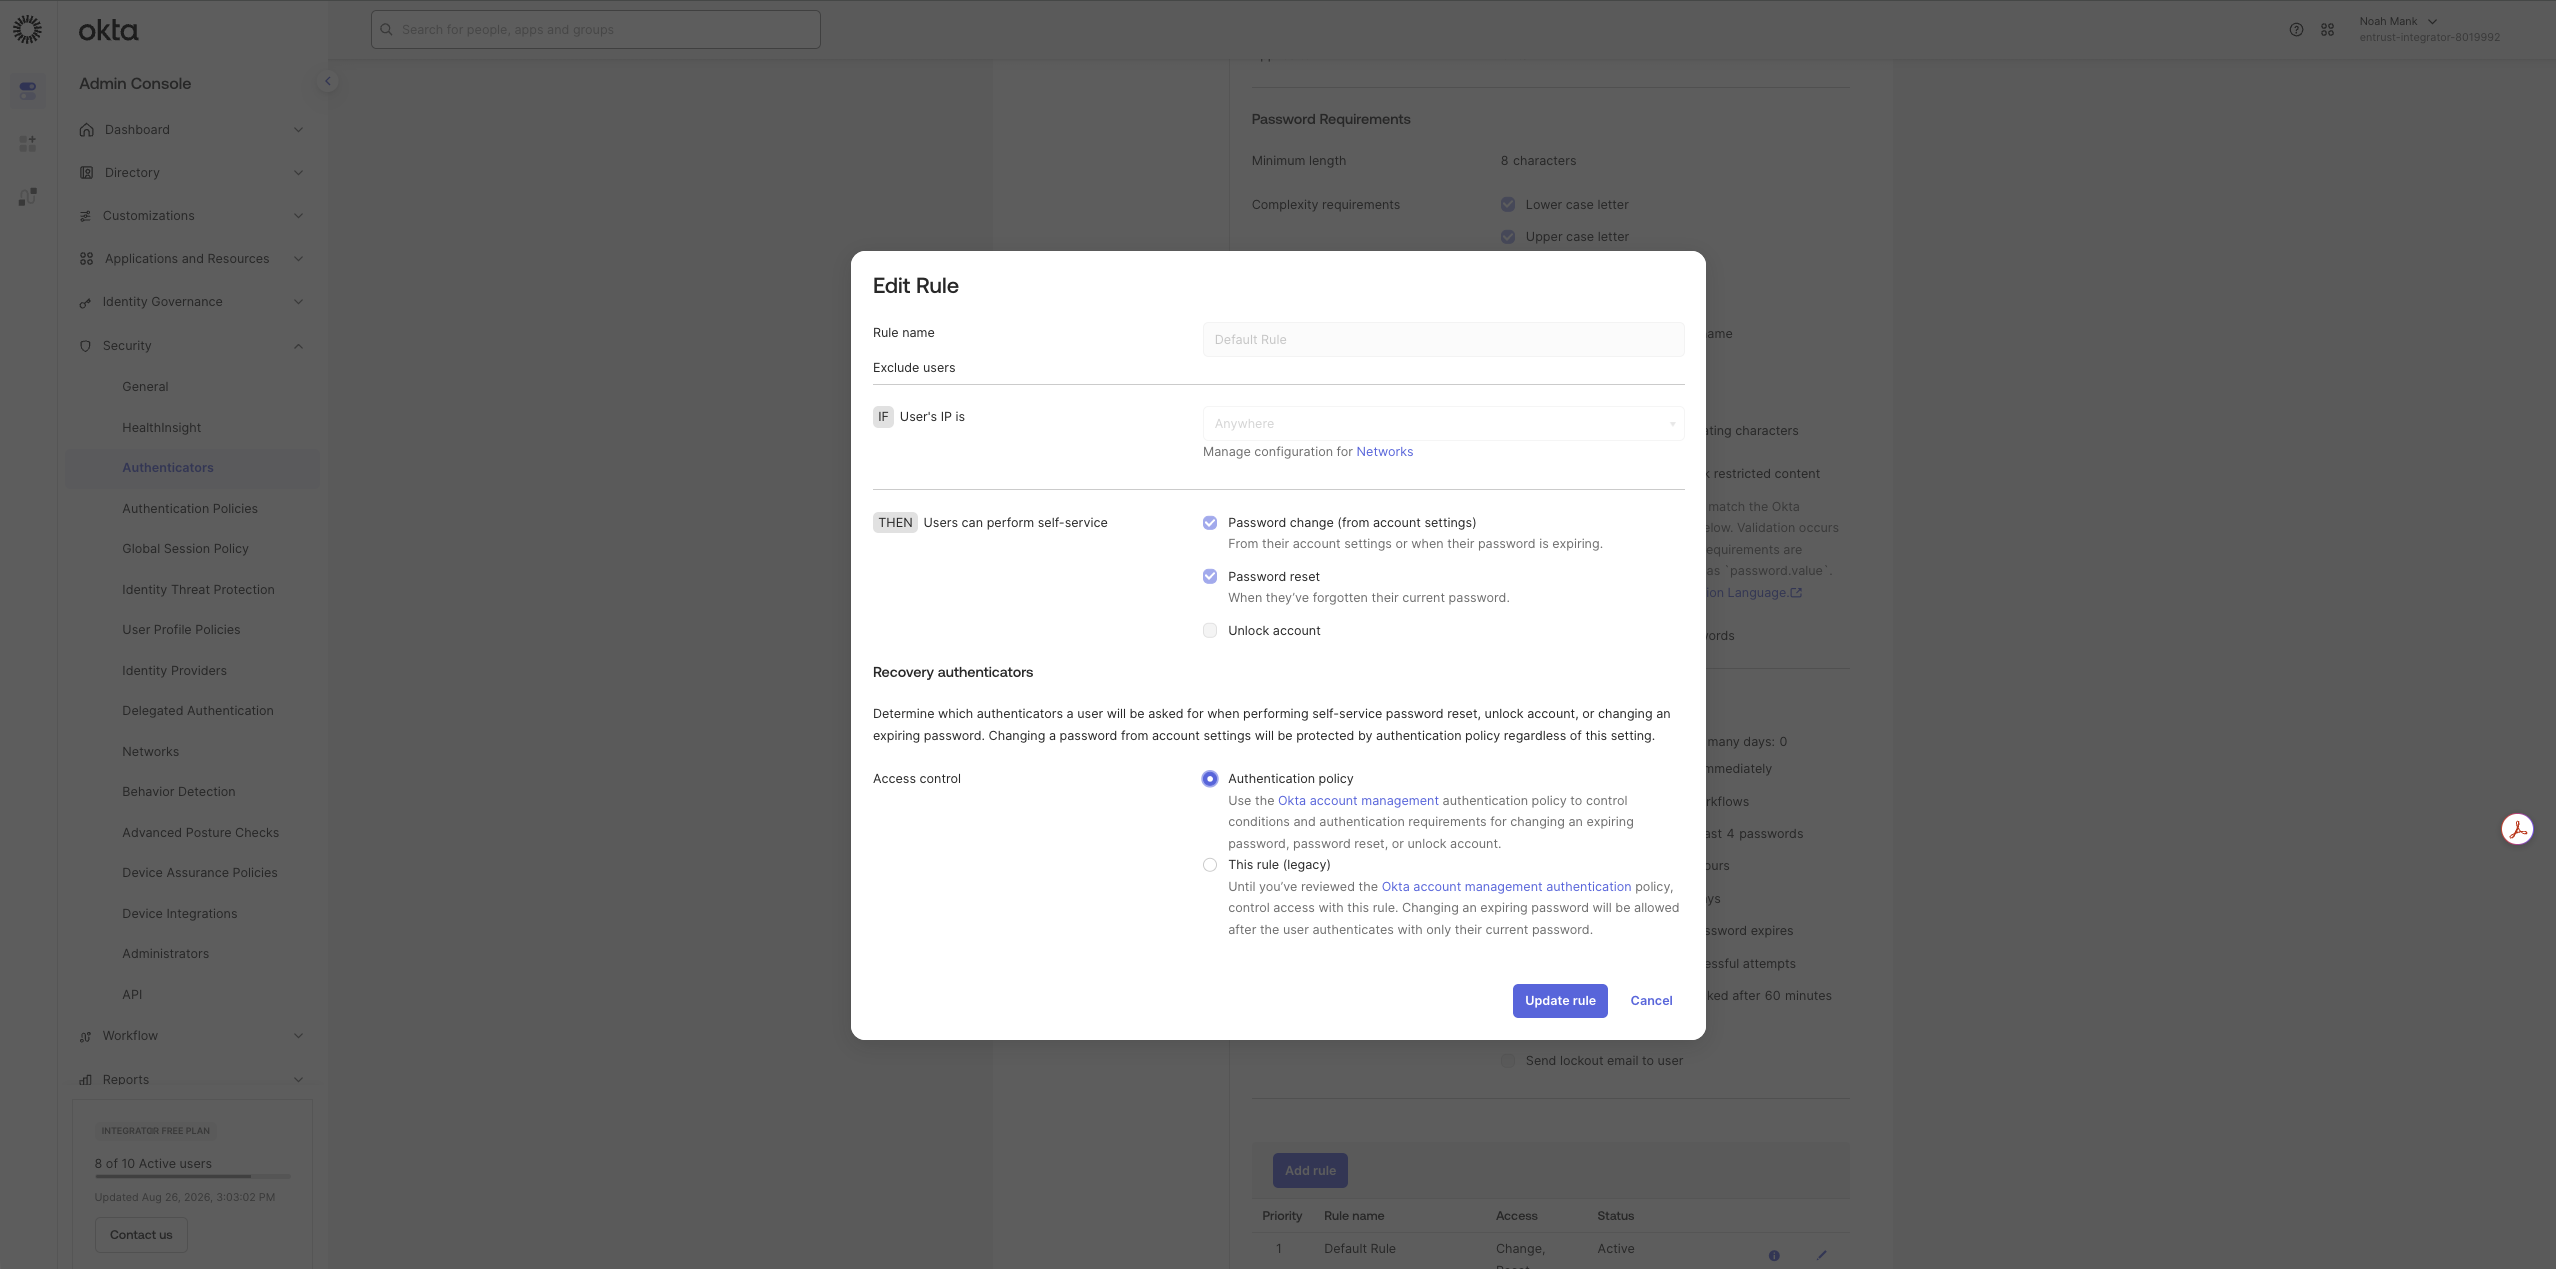
If Access control remains set to This rule (legacy), self-service password reset, account unlock, and changing an expiring password will bypass the Okta account management authentication policy, and Entrust identity verification will not be triggered for these flows.
Regional routing and data residency
Entrust's Okta integration is served through a single global endpoint set that is fronted from the EU. For most customers this is transparent, but organizations with strict regional data privacy requirements (for example, requiring that identity data never leaves the US) may need verification traffic to stay within a specific jurisdiction instead.
For these cases, register a separate Custom IDV vendor entry in your Okta Admin Console using the regional endpoint values below, so that verification traffic does not transit through another region. This regional configuration is a fallback for customers with strict data residency requirements; most organizations do not need it and can use the standard setup described earlier in this guide.
Regional endpoint values
Each endpoint follows the same structure, with a region identifier inserted into the hostname: https://api.{region}.onfido.com/okta/oidc, where {region} is one of eu, ca, or us.
| Field | Value |
|---|---|
| Issuer | https://api.{region}.onfido.com/okta/oidc |
| PAR request URL | https://api.{region}.onfido.com/okta/oidc/par |
| Authorize URL | https://api.{region}.onfido.com/okta/oidc/authorize |
| Token URL | https://api.{region}.onfido.com/okta/oidc/token |
| JWKS URL | https://api.{region}.onfido.com/okta/oidc/jwks |
Troubleshooting
| Symptom | Likely cause | Check |
|---|---|---|
| Verification never launches | The Authentication Policy rule is not scoped to an Account Management Policy trigger | Confirm the rule is attached to enroll, recover, or unlockAccount, not application sign-in |
| Okta rejects the PAR request | Client ID or Client secret is out of date | Confirm the credentials in Okta match the current values in the Workflow Studio Credentials section |
| Policy always denies the action | Client secret was regenerated in Workflow Studio without updating Okta | Copy the new Client secret from Workflow Studio and update the corresponding value in the Okta Admin Console |
| Self-service password reset or unlock account doesn't trigger verification | The Password authenticator's Access control is set to "This rule (legacy)" | Set Access control to "Authentication policy" under Security → Authenticators → Password rule |