Migrating to Workflow Studio from an API integration
Introduction
Workflow Studio is Entrust's comprehensive platform enabling you to design, orchestrate and implement identity journeys through an intuitive drag-and-drop interface, minimizing the need for custom integration code. It provides a high level of configurability and adaptability and is our recommended method of integration.
This guide is designed for customers who are currently implementing identity verification using our checks and reports API (also known as a Classic integration), but are looking to migrate to Workflow Studio. We recommend usage of our Identity Verification SDKs in conjunction with Workflow Studio for the best performance.
Here you will find guidance on the steps required to migrate from Classic to Workflow Studio, highlighting the key differences and similarities between the two integrations to help you identify the changes you need to make to start using Workflow Studio.
You will also learn about some of the benefits that come with integrating your indentity verfication flows using Workflow Studio.
Features unique to a Workflow Studio integration
Workflow Studio is a powerful and intuitive platform for building identity verification journeys. The no-code, drag-and-drop environment of the Workflow Builder enables you to efficiently create and deploy verification workflows, offering the flexibility to quickly tailor end-user journeys to cater for specific use cases, geographic regions and risk profiles. Whether your goal is to reduce fraud, meet regulatory compliance standards or improve the user experience and success of customer onboarding, Workflow Studio provides the tools to adapt quickly and effectively.
Functionalities exclusively available through Workflow Studio include:
-
A wide range of Entrust's latest identity verfication solutions are exclusively available through Workflow Studio. This includes our suite of ETSI-certified compliance solutions, biometric and passkey authentication, Document Report Instant, Mastercard Identity account opening, Microsoft Verified ID, Advanced e-Signature and our market-ready solutions for France, Romania, Australia and Mexico
-
Smart Capture Link: a low- to no-code frontend solution hosted by Entrust, enabling you to build and deploy identity verification workflows with minimal engineering effort
-
Workflow Studio comes with dozens of pre-built workflow templates, accelerating the deployment of tailored workflows for a wide range of verification, authentication, fraud prevention and compliance use cases
-
Studio workflows are dynamically linked to our SDKs, meaning that changes made in a workflow are automatically reflected in your verification journeys, reducing maintenance overhead and improving agility
-
A workflow analytics dashboard offers visibility into how identity journeys are performing by identifying potential bottlenecks and drop-off points. This informs data-driven decisions to rapidly iterate on workflows in real time to improve conversion rates, enhance security and streamline the end-user experience
Migrating your account settings
When migrating to Workflow Studio, we recommend you keep using your existing Entrust account, as all of your historical verification data will still be available to take advantage of products such as Known Faces and Repeat Attempts. At the same time, all of your existing Applicant IDs will remain accessible for re-use.
Once Workflow Studio has been activated for your account, your Dashboard should then include both your Classic check-related pages, as well as Workflow Studio pages (see image below). You can reach out to Customer Support or your Customer Success Manager to set this up for you.
Please note: Studio Workflows and Classic checks are entirely separate and independent of one another. If required, you can continue to run API-based checks in the same account as you run Studio workflows, even using the same Applicant.
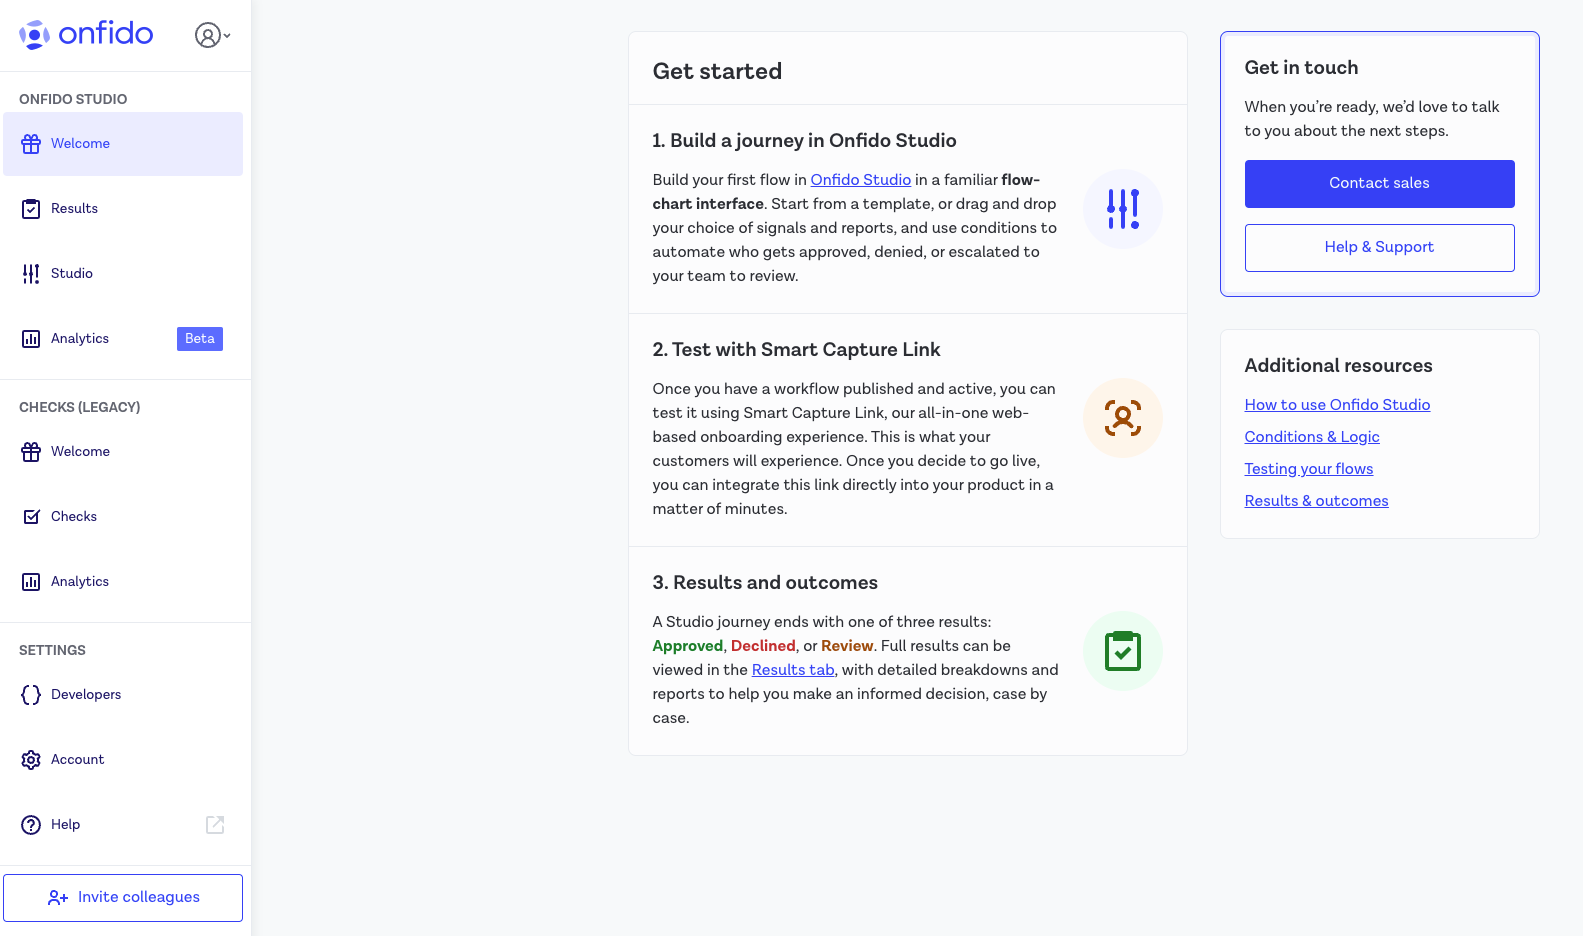
Classic checks and Studio workflows can be managed on your existing Dashboard account.
Differences between Classic and Studio at a glance
The table below offers a high-level overview of the major differences and similarities between Classic check-based integrations and Workflow-based integrations using Workflow Studio. Each of these integration steps is described in more detail in the paragraphs below.
Please note: New identity verification features are only being developed for and added to Workflow Studio. While existing Classic integrations remain supported, we recommend integrating with Workflow Studio to access all of Entrust's latest verification solutions.
| Action | Classic | Workflow Studio |
|---|---|---|
| Create an Applicant | Create an Applicant using the Create Applicant endpoint | Create an Applicant using the Create Applicant endpoint |
| Generate SDK Token | Generate an SDK Token using the SDK Token endpoint | Workflow Studio exposes the SDK token in the workflow run payload returned by the API when a workflow run is created or retrieved |
| Initialize SDK | Our iOS, Android and Web SDKs have their own methods for configuration and initialization in a Classic integration (specific details can be found in the SDK initialization section below) | In Workflow Studio, the iOS, Android and Web SDKs maintain their own method of configuration, the key difference being a Workflow Run ID is passed in when the SDK is initialized |
| SDK callbacks | Our iOS, Android and Web SDKs have their own methods for configuring callbacks | Although callbacks and error handling are handled similarly in Workflow Studio, there are some differences highlighted in the paragraphs below |
| Customizing the SDK | Our iOS, Android and Web SDKs have their own methods for customization (specific details can be found in the SDK customization section below) | There are some differences in customizations available in Workflow Studio (specific details can be found in the SDK customization section below) |
| Create a verification | Initiate an identity verification journey using the Create Check endpoint | In Workflow Studio, identity verification journeys are managed through workflows, initiated using the Create Workflow Run endpoint. Do not create checks as these are not applicable or relevant in Workflow Studio |
| Receive webhook | Entrust offers a number of Check and Report webhook events for Classic integrations | Create a new webhook in the Dashboard and use the workflow_run.completed event. Other Workflow and Task webhook events are also available |
| Retrieving verification results | The results of a verification check are obtained by using the Retrieve Check endpoint and are returned in the result attribute | We recommend you use the workflow_run.completed webhook event, which contains the Workflow Run object, including the Workflow result. If you are unable to use webhooks, then use the Retrieve Workflow Run endpoint, results are returned in the status attribute |
| Retrieving report results and properties (such as result, sub-Result and breakdowns) | Use the Retrieve Report endpoint, results are found in the result, sub-result and breakdown attributes | The recommended guidance is dependent on the use case of Report results and properties. Find more details in the paragraphs below |
| Downloading media (such as document photos, live photos or live videos) | Document: Make a call to the List Documents endpoint to obtain the Document IDs associated with an Applicant, then use the Document ID in a call to the Download Document endpoint. The same pattern applies for the other media types: Live Photos, Live Videos and Motion Captures | Document: In Workflow Studio the Workflow Output feature can be used to obtain the Document IDs associated with an Application from a given Workflow. This can then be used in a call to the Download Document endpoint. The same pattern applies for the other media types: Live Photos, Live Videos and Motion Captures |
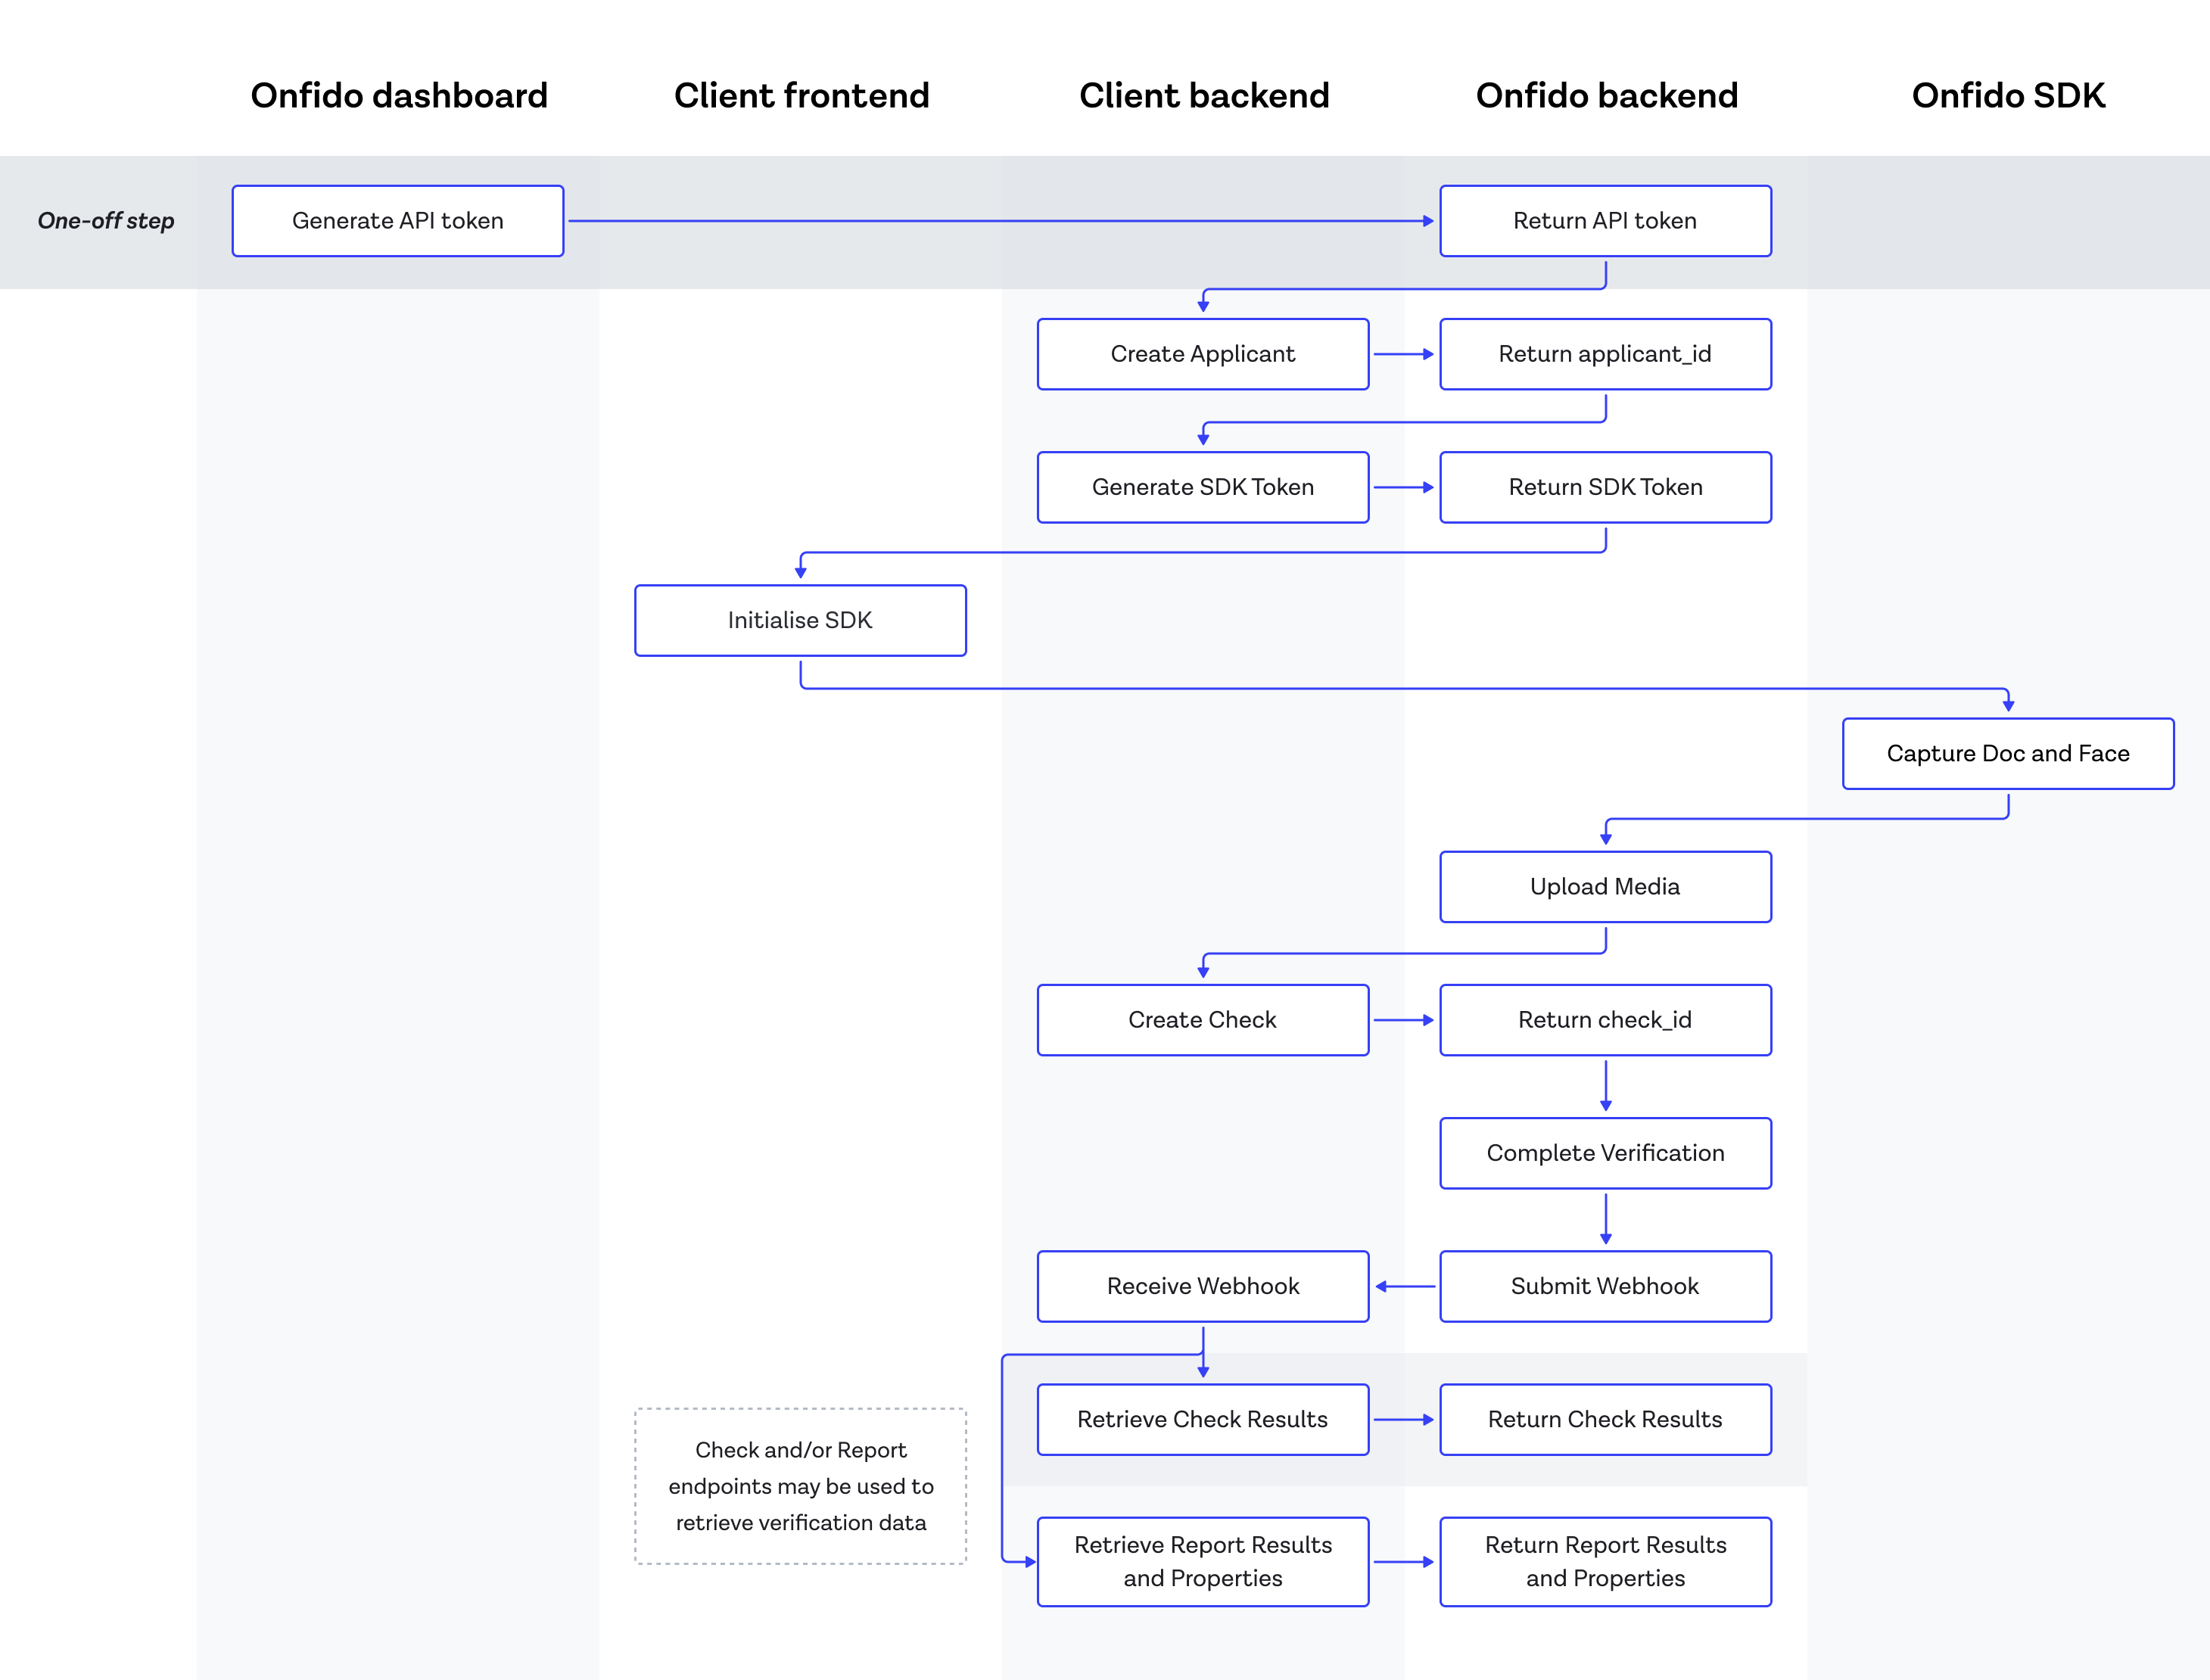
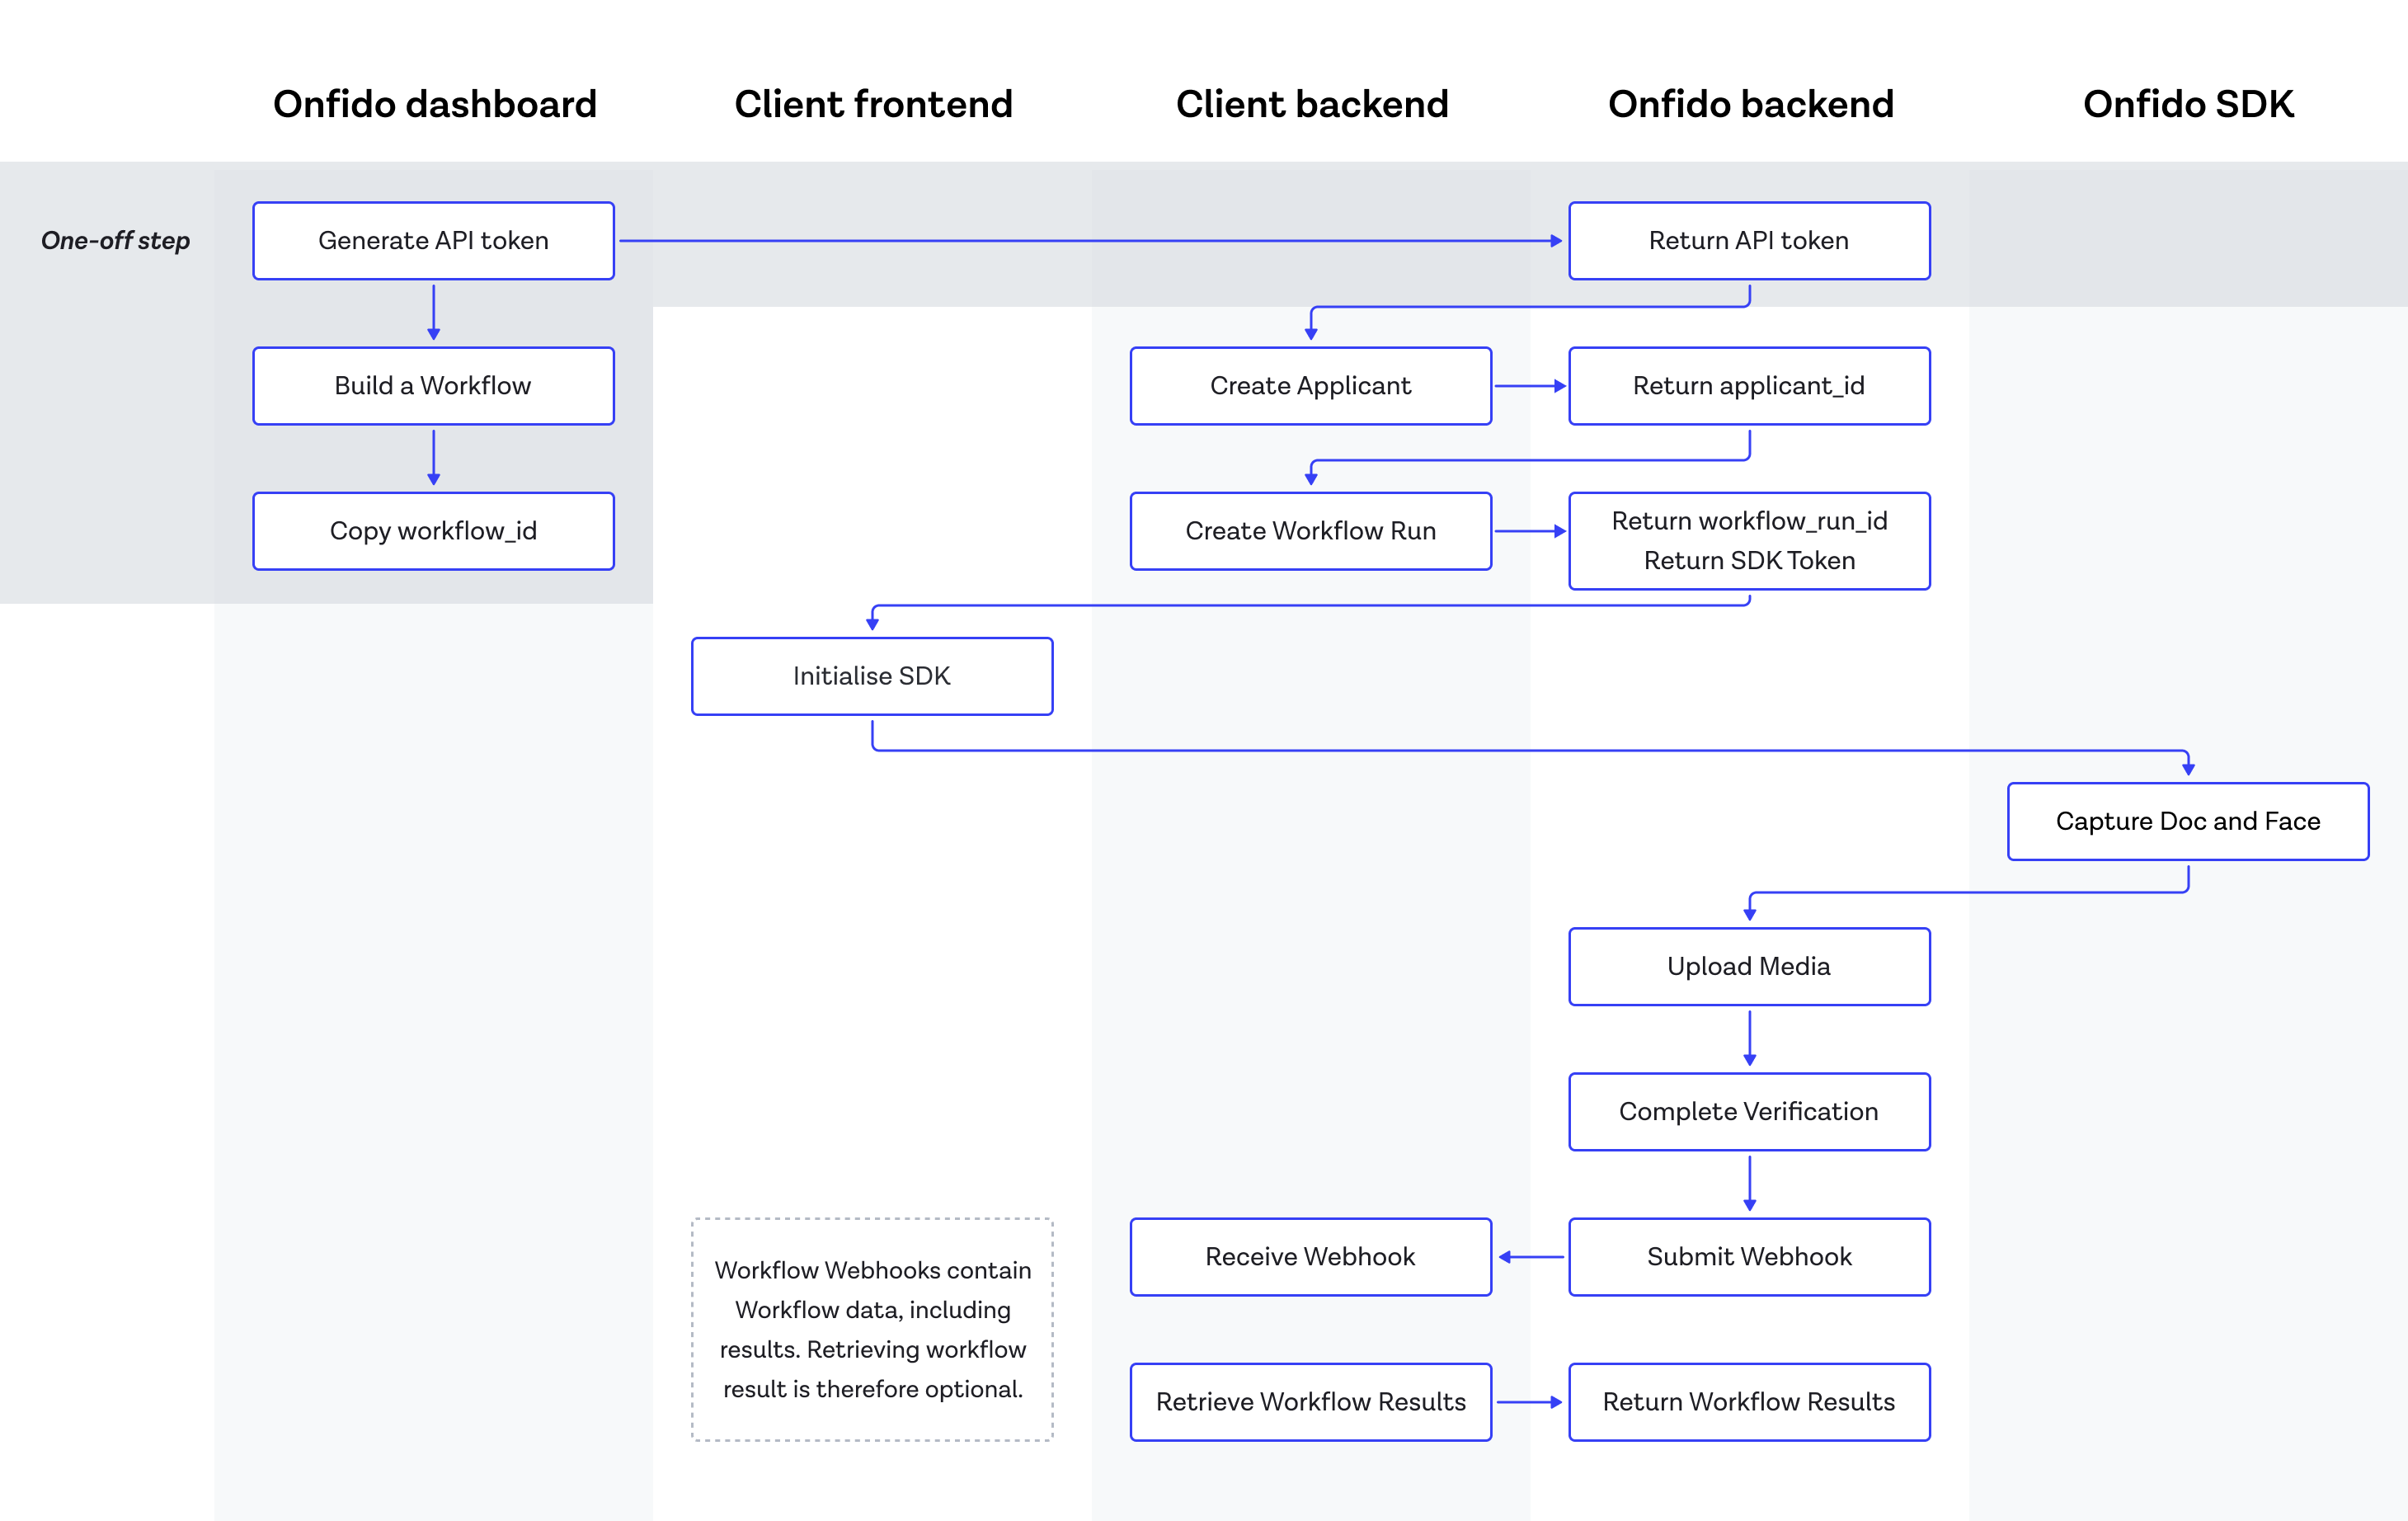
The two flow charts below outline the main differences when creating identity verfication checks in Classic and Workflow Studio.
Classic
Workflow Studio
API versioning and endpoints
API versioning
In order to use Workflow Studio, you must be using v3.4 or later of the Entrust Identity Verification API. We recommend you switch to the most recent available version when making integration changes as many verfication signals are available only on the latest API version.
API endpoints
Workflow Studio introduces a set of key API endpoints that replace those used when implementing identity verfications in a Classic integration. These API mappings are detailed in the table below:
| Classic endpoints | Workflow Studio endpoints |
|---|---|
| Create Check | Create Workflow Run |
| Generate SDK Token | Create Workflow Run |
| Retrieve Check | Retrieve Workflow Run |
| Retrieve Report | Retrieve Workflow Run |
Create an Applicant
Creating an identity journey begins by creating an API token and an Applicant ID. The process for doing this is identical for both Classic and Studio integrations, and documentation can be found on our API reference.
Changes to the SDK in Workflow Studio
SDK versioning
The minimum required SDK version for Workflow Studio depends on the specific workflows you create. This is because different Workflow Studio tasks have different minimum supported SDK versions. When creating a workflow in the Workflow Builder, the minimum supported SDK versions are displayed in the right-hand configuration panel.
Entrust always recommends being on the latest version of the SDK to allow you to take full advantage of Workflow Studio's capabilities, as well as benefit from the best SDK user experience and performance.
Obtaining an SDK Token
Workflow Studio generates and exposes SDK tokens in the workflow run payload returned by the API when a workflow run is created.
Initializing the SDK
Under a Classic integration, each SDK has its own method of initialization. Once initialized, the SDK can then capture the end-user's (Applicant) document, live photos or videos, as well as run any of the reports defined in the steps of the flow configuration.
With Workflow Studio, the key difference when initializing each SDK is that you must pass the Workflow Run ID into the initialization code, together with the SDK token. The SDK communicates directly and dynamically with any active Studio workflows you have built for your verification journeys, displaying the relevant screens to ensure the correct capture and upload of end-user information (such as identity documents, live photos and videos). This removes the need to configure any flow steps directly in the SDK as these will be included when the workflowRunId attribute is passed into the SDK initialization code. Once the SDK steps are complete, the captured media will then be automatically passed to the relevant reports as specified by the tasks in the workflow. Documentation for initializing the SDK using a Workflow Studio integration can be found here: iOS, Android, Web, React Native and Flutter.
Please note: You must never include both the Classic steps attribute and the Workflow Studio workflowRunId attribute in the same initialization code. Classic will override Workflow Studio, resulting in an abandoned workflow status, with any captured documents and images ending up in the Classic environment.
SDK callbacks
SDK callbacks and error types are handled in largely the same way in Classic and Workflow Studio, however there are some minor differences.
You can access SDK callbacks documentation for the Classic integration here: iOS, Android and Web, and likewise for the Studio integration here: iOS, Android and Web.
Please note: In a Classic integration, the complete or success callback can be used to help trigger the creation of a check. In Workflow Studio, this action is no longer relevant as the workflow will automatically handle the creation of the appropriate reports, based on the report tasks configured in a workflow.
Customizing the SDK
Flow Customization: For both a Classic or Workflow Studio integration, you can customize the flow of an end-user's identity journey (skipping the welcome screen, for example). In Workflow Studio, flow customization is handled by the design and configurations in the Workflow Builder.
UI Customization: The UI of an end-user's identity journey (such as color and font) can be customized for Studio workflows. The customizations available are described in our reference documentation for iOS, Android and Web.
Language Localization: The language of an end-user's identity journey can be localized for Studio workflows. The localization options available are described in our reference documentation iOS, Android and Web.
Creating a verification and retrieving verification results
Creating a verification
With a Classic integration, customers can implement identity journeys using the checks endpoint to Create Checks.
In Workflow Studio, checks must not be used and are not applicable. Instead, everything revolves around designing workflows and using the Workflow Runs endpoints. The process begins by making a call to Create Workflow Runs, providing the ID of the workflow in question, as well as an Applicant ID.
Retrieving verification results
Classic customers use the Retrieve Check endpoint to obtain the check result.
In Workflow Studio, this is replaced by the Retrieve Workflow Run endpoint, with results found in the status attribute. Many customers use webhooks to trigger the retrieval of results, and therefore in Workflow Studio we recommend you use the workflow_run.completed webhook event to retrieve the workflow result. In this webhook event, the resource attribute contains the Workflow Run object described above. More details on webhooks can be found in our documentation.
Obtaining report results and properties
In a Classic integration, the report results, breakdowns and properties of a verification check can be obtained using the Retrieve Report endpoint. In a Studio integration, how these results are retrieved depends on how you as a customer want to consume the data.
Building backend logic
Some customers may use the report results, breakdowns and/or properties to build logic and orchestrate their identity verification flows in their backend. In a Classic integration, this is done using the Retrieve Report endpoint. In Workflow Studio, however, this logic is now handled within the workflow. Therefore, it is recommended to stop consuming data from the Reports endpoint as it is no longer needed.
Retrieving report data
Some customers require attributes from the Reports endpoint in order to feed into their internal systems (such as passing the extracted Document properties and sub-results into a case management system). With Workflow Studio, this can be done in the Workflow Builder by configuring Workflow output (see image below). This allows you to define any required output properties and then retrieve data via the Output object returned by the Retrieve Workflow Run endpoint.
A workflow can be configured to output specific report attributes or all attributes from the full report in a single output property. Please refer to our Studio product guide for more detailed information.
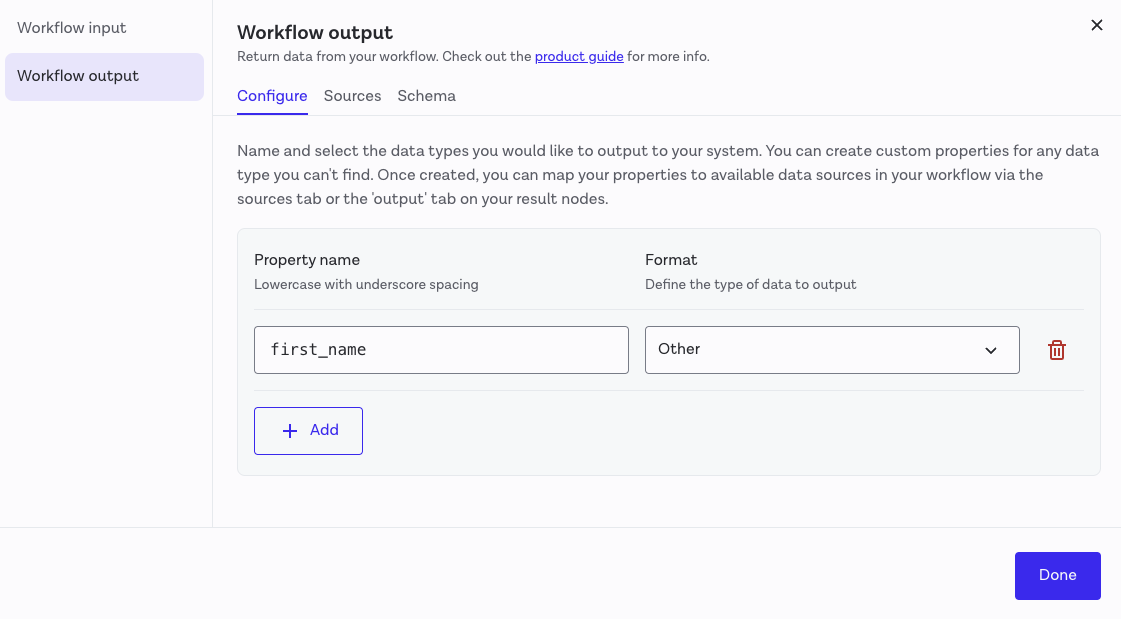
Results of a Studio workflow can be defined as Workflow Output data.
Other uses
If the recommendations above do not satisfy your retrieval needs, please reach out to Customer Support or your Customer Success Manager.
Receiving webhooks
Entrust provides webhooks to alert you of changes in the status of your indentity verifications.
With a Classic integration, this was done by configuring Check or Report webhook events (such as check.completed or report.completed).
In Workflow Studio, the workflow_run.completed webhook event should be created from the Dashboard and used (see image below). This webhook event also contains the Workflow Run object within it and can therefore be used to retrieve the results of the workflow.
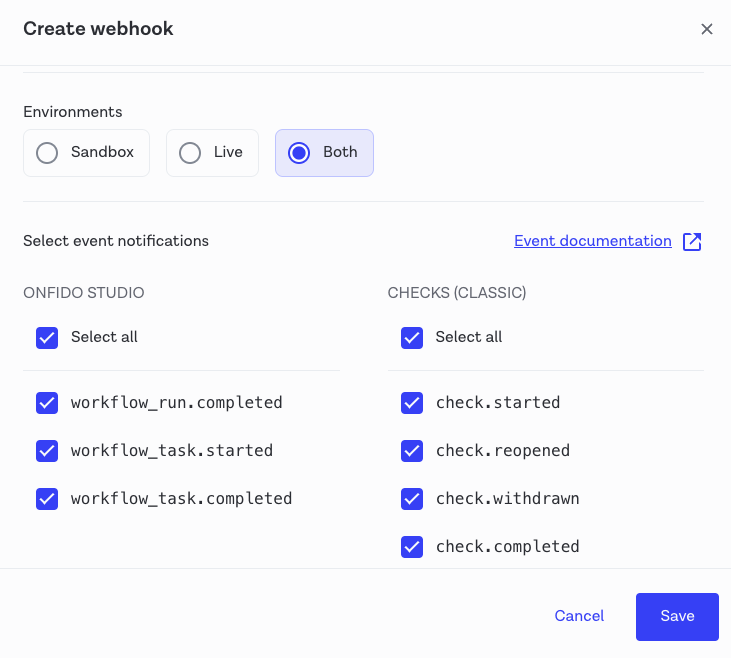
Workflow Studio has its own set of webhook events that can be defined in your Dashboard.
The table below illustrates a selection of Classic webhook events and their equivalent Studio webhook events:
| Classic webhook events | Workflow Studio webhook events |
|---|---|
check.started | workflow.task.started |
report.completed | workflow_task.completed |
check.completed | workflow_run.completed |
check.started | workflow.task.started |
More detailed documentation about webhooks and the full list of webhook events can be found in our API reference.
Downloading media
For customers who need to download media (such as images of captured documents or selfie photos and videos), the Classic integration offers a range of API endpoints. Using a Document ID obtained via the List Documents endpoint, a call to the Download Document endpoint will return an image of a captured document. The same pattern applies for all other Media types: Live Photos, Live Videos and Motion Captures.
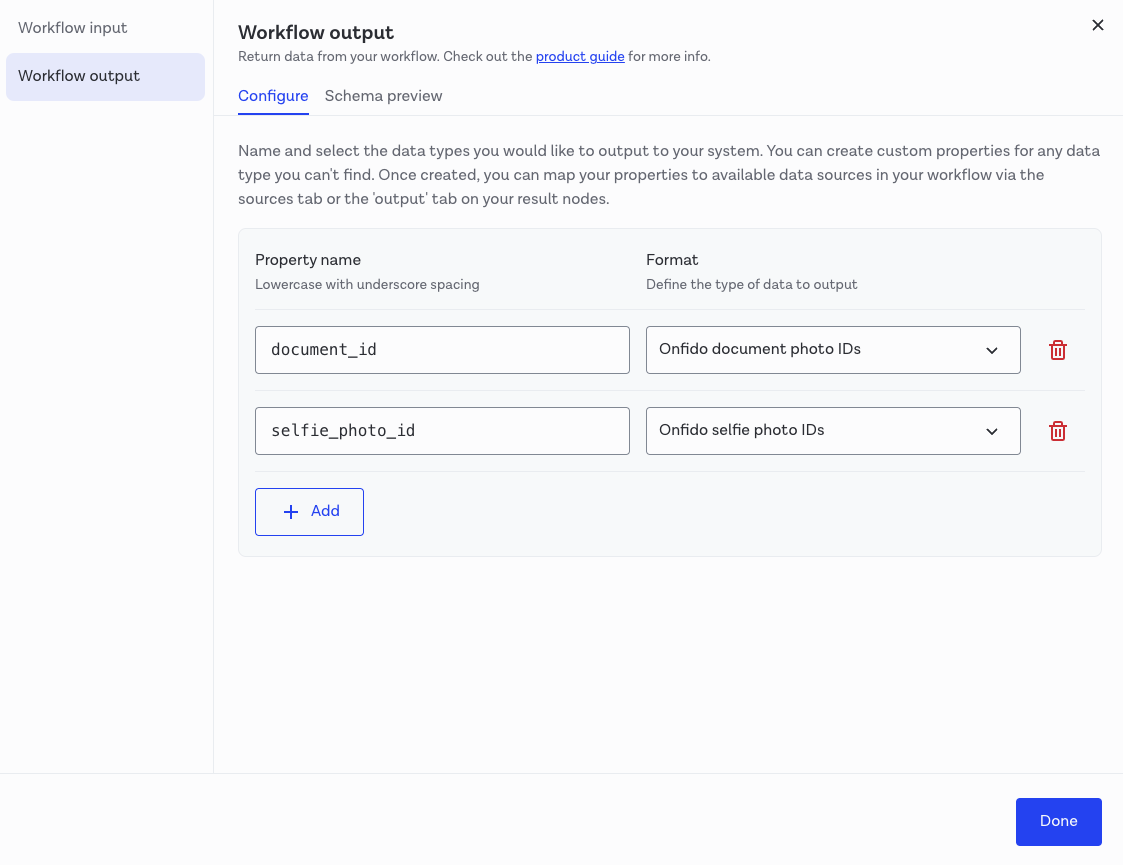
For Workflow Studio, the same process can also be utilized. However, in order to retrieve the Media ID (Document ID, for example) for a given Workflow Run ID, it is recommended to use the Workflow Output feature. In the image below, you can see how the document photo ID and selfie photo ID have been defined in the Workflow output. These properties will then be available to retrieve from the Retrieve Workflow Run endpoint in the output attribute. By doing so, you will be able to:
- establish which media was uploaded for each specific flow for that applicant (each applicant may go through different flows)
- differentiate between multiple media when you, for example, require different document types to be captured in the same flow (such as driving license and passport)
Side-by-side comparison of essential Classic and Workflow Studio integration steps
In the table below, the essential steps of a simple Classic and simple Workflow Studio integration are listed:
| Steps | Classic integration step | Workflow Studio integration step |
|---|---|---|
| Step 1 | Create an applicant | Create an applicant |
| Step 2 | Generate an SDK token | Create workflow Run |
| Step 3 | Create check | Obtain SDK token |
| Step 4 | Receive webhooks | Receive webhooks |
| Step 5 | Retrieve Check and Report results | Retrieve Workflow Run for results |